How To: Installing a Network Patch Panel and Switch
Patch Panel vs. Switch
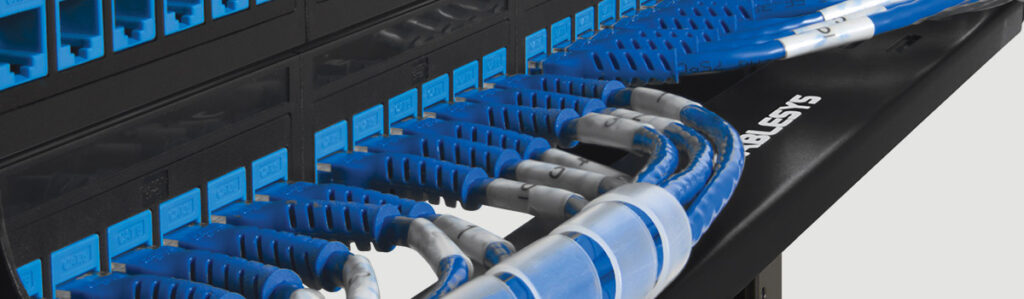
When connecting devices in data centers, two common components include a patch panel and a network switch. A well-designed structured cabling system can make installation of a patch panel and an Ethernet switch effortless. Once mounted on the server rack, the use of horizontal cable management can keep everything neat and tidy
What is the difference between a patch panel and switch?
While a patch panel and switch may look the same on the front with their rows of ports that is where their similarities end, as each component serves a different purpose in a telecommunications room. A patch panel is a passive component that compliments the switch. The panel is designed to group multiple network ports in a single location which helps organize the wiring. Labeling the cables connected to a patch panel makes it is easier to identify signal flow as well as diagnose and troubleshoot any technical issues. In contrast, an Ethernet switch is an active component that receives, processes, and forwards data to multiple devices such as computers, servers, as well as other Ethernet IP devices such as security cameras. Devices can be networked together by connecting them to the switch through the patch panel. A switch is required in a local area network (LAN) whether a patch panel is used or not.
Steps for Installing a Patch Panel and Switch
Determine where the patch panel and switch should be installed
Evaluate the operating environment, a place where the equipment and components can be maintained well and accessed easily. Unobstructed airflow and vents are crucial.
Build or purchase pre-terminated patch cords
Determine patch cord lengths as well as the quantity needed for the installation. If improper lengths are chosen, cables with excessive slack will not only increase material and installation cost but also hinder cable management.
Map out the ports
Determine which switch port is connecting to which patch panel port, by doing this can reduce installation time.
Mount the patch panel and switch
Ensure the server rack accommodates the size of your components (EIA standard 19″ width is most common).
Connect the patch panel to the switch
With the prepared patch cords, follow the port mapping created in step 3 and patch the cables.
Install cable management
Using horizontal and vertical cable management and cable ties to organize cables can help make future changes and upgrades easy.
Label cable
Tag both ends of each cable the same; this can assist in troubleshooting your end-to-end connectivity between the patch panel and the switch.
Horizontal Cable Management
With the use of horizontal cable management, horizontal pathways are created for patch cords to be routed cleanly and easily. Examples of horizontal cable managers include finger ducts, rings, lacing bars, and d-rings.
Vertical Cable Management
Using vertical cable management can help facilitate a proper bend radius for the cables as they run down the rack vertically. Examples of vertical cable managers include finger ducts, channels, and rings.
HOW WILL THE INSTALLATION HAPPEN?
The smart meter installation process is straightforward. Your energy supplier will install your smart meter at no extra cost and the installation only takes a couple of hours so you’ll be up and running in no time. This page will help you to understand the installation process and avoid problems.
BEFORE YOUR INSTALLATION
Your energy supplier will contact you beforehand to arrange a time and date for your installation. They will tell you what to expect, how long it will take and if there’s anything special you need to do before the visit.
You will need to let the installer in on the day and make sure they can get access to your traditional meters. So you might need to clear out the cupboards. If you have any access issues, do let your supplier know.
Your engineer will need to turn off your electricity and/or gas supply to complete the installation. So, ensure you save any important documents on your computer saved and switch off household alarms before the installers visit. And remember to switch everything back on afterwards
DURING YOUR INSTALLATION
Depending on whether you’re having one or both replaced, you’ll get an electricity smart meter and/or a gas smart meter. These smart meters normally go exactly where your old meters were. If they need to be fitted nearby, the installer will ask you first.
Your smart meter installation
What information will I get before my smart meter installation?
We’ll send you a confirmation email when you book, telling you everything you need to know about your smart meter installation.
Are your engineers fully qualified?
You can rest assured that all engineers – and anyone we work with in partnership to carry out installations for us – will have the correct accreditation (Smart Meter Installation Code of Practice or SMICoP) and training to complete your installation safely.
What will happen on the day?
One of our engineers will arrive within the time-slot you booked – they can arrive at any time during the 4 hour time slot. But there are a few things you’ll need to do before they arrive to make sure everything runs smoothly. If you’ve got any concerns about meeting any of these requirements, give us a call in advance so we can make specific arrangements to avoid cancelling your appointment
We’re legally required to make sure someone aged 18 or over is home to let the engineer in and be present for the whole installation. Make sure an adult will be home during your booked appointment
Make sure the area around your meters is clean and completely free from obstructions – you’ll need to move items like hoovers, bags and storage boxes completely out of the way.
Bundle Mode or Install Mode?
IOS XE supported switches such as the 3850 and 3650 support two modes, Bundle mode and Install mode. New switches, by default, are shipped with install mode. If you never paid attention during an IOS XE upgrade on a switch you may have just copy the IOS XE image to flash and set the system boot variable to boot from the new IOS using the command below
This is the traditional way of setting the IOS boot image. This is what Cisco refers to as Bundle mode. Bundle mode is simple. You just download the image and set the boot variable to the new image and reboot the switch. However, there are differences between the two modes and one must be careful when upgrading a switch stack and that all the switches in the stack are running the same mode to avoid incompatibility issues.
Install Mode
Install mode is the default mode for the switch. This mode uses a package-provisioning file named packages.conf in order to boot the switch. In addition, there are a number of .pkg files in the flash as shown in the output below. There files are not to be altered. With Install mode you no longer need to manually copy the IOS XE to each switch. This can be performed using an option during the upgrade procedure. This can be especially useful when managing a large number of switches.
Install mode requirements and restrictions
To use Install mode in a switch stack, all switches in the stack must have the same license as the active switch. In addition, Install mode has the following restriction:
Booting from a USB driver or TFTP in Install mode is not supported
Bundle Mode
The Bundle mode uses the monolithic Cisco IOS images to boot a switch. This mode will use more RAM memory than the Install mode since the packages are extracted from the bundle and copied to RAM during bootup. Bundle has the following restriction:
Auto-upgrade feature is disabled by default and is not available in the Bundle mode.
Things to Know Before Buying and Installing 12V LED Strip Lights
Flexible LED strip lights are used all over the world in various industrial, commercial and residential projects. LED strip lighting is popular among many Architects and Lighting Designers due to the improvements in efficiency, color options and brightness. The biggest draw is how easy they are to install. Their flexibility, low-profile and helpful accessories make them the most popular LED strip for the at home DIY types. With these LED strips, a homeowner can design like a professional with the right supplies and just an hour or two.
There are many options for LED strip lights with no simple ‘one size fits all’ standard to go by. This LED Strip Resource Guide will educate newcomers and experts alike on finding the best LED strip lights for the job and how to use them while overcoming common installation hold-ups.
LED Light Strips: What Makes them so Special?
LED strip lights, also known as LED tape lights or LED ribbon lights, are known for their low-profile size and flexibility. Efficient LEDs sit on a 10mm wide circuit board, offered in 3ft to 16.4 ft lengths. Flexible LED strip lights have many features that make them easy to use in a variety of situations
Flexible LED strip with Adhesive – The LED strips have a 3M adhesive backing for simple mounting options. The low profile, flexible strip has a peel-off backing which exposes the 3M adhesive, making for a simple peel-and-stick install.
Waterproof or Non-Waterproof – LED strip lights are not limited to indoor projects. The waterproof LED strip lights are IP65 rated with a silicone resin material that protects the strip components from dust and moisture. The waterproof LED lights are a little more expensive but are a must for any project that is outdoors or close to water.